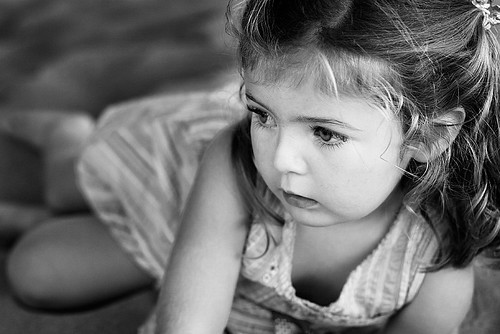
50mm @ F/2.8 1/60th ISO200
For me, what really makes a portrait come to life is dynamic lighting. There's many ways to do this, but I wanted to touch on pulling it off using natural light only.
The shot above was taken late in the evening at the beach with the sun very low and off to the far right. With the sun so low the entire sky becomes a diffused light source with the point near the sun being a bit brighter, so what you get is a wrap around lighting and that is feathered from the far right of her tailing off to the left.
This is a key point that I want to stress here. The hardest thing about mastering natural light photography is realizing where your light source is. I'll give you a hint, the sun is not the only "light source" in natural light photography. Take this shot for instance taken at what people call the "worst time of day to shoot", which is around high noon with the sun high in the sky.
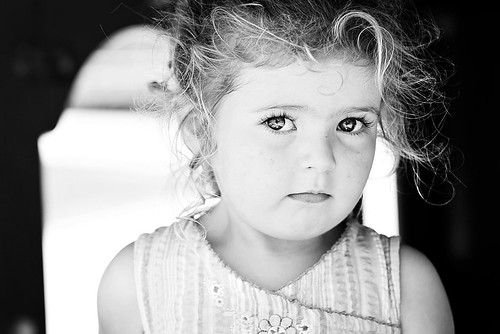
85mm @ F/2.8 1/500th ISO200
So with the harsh sun glaring down how did I pull off this beautiful soft lighting? Simple, I took advantage of the situation and found a location with secondary light sources. What are these secondary light sources? Well, in this case she's inside a small playground train car. The sun is so high that it's not going directly into the windows and door opening. What can of you think of that is providing her light? Now you're thinking light sources. This train had sand all over outside of it and concrete beyond that. This is all reflecting back up into the train. Further out bits of open sky and such are also reflecting light back. These are all light sources. Using these properly is how you achieve dynamic lighting. Look at the interesting catch lights in her eyes. These are direct reflections of those bright areas reflecting in.
To make a portrait have that dynamic lighting look, you'll want to find a spot and an angle such that you can use one light source as a main and others for fill or possibly back lighting, rim lighting, etc. Think of it much like you would to set up studio lighting, only the sky is your large softbox and other reflected objects and areas can be your other lights.
I can't stress enough how important good use of light sources is in creating a dynamic portrait, but there are some photoshop tricks you can do to enhance this once you've captured it. I'll go through my normal photoshop conversion process for a B&W photo to illustrate a few tricks.
For these B&W shots I start out with my color photo and first add a strong constrast with a new curves adjustment layer. You can use the PS defaults if you have a version with those, the increase contrast and strong contrast defaults work pretty good but are usually too strong. This is ideal actually because it allow you to tweak it until it's just right. If you don't have the defaults google around for "S-Curve" adjustments and play around with it. Once you've applied this layer go to the layer "opacity" and lower it down until the contrast look more right. I usally end up bumping this up a tad more after I convert to B&W, but just keep in mind you can control the contrast with that slider from here.
The next thing I like to do is make the eyes pop. In my portraits the eyes are meant to be the focal point of the entire shot so I like them to stand out a bit. Just be careful not to overdo it, which it is very easy to do. Start out by creating a duplicate background layer by pressing ctrl-j on a PC with the background layer selected. Next change this new layer's mode to screen. You'll notice your entire image just got brighter. This is also my favorite way of lightening an image. You can move the opacity slider for the layer down until you get just the right brightness and can even selectively brighten with use of a mask. That's what we're going to do with the eyes, but for now leave the opacity at 100%. Next hit the mask button on the layers pallete will holding the alt key to create a mask the covers the whole layer(alternatively you can make an empty maks and use the paint bucket on it with black selected). Now you'll notice all the brightness of the layer is gone, so what we're going to do is bring some back. Zoom into the region around the eyes and select the paintbrush and make it's color white so we can paint to remove the mask. Also make sure the brush type you select has a soft edge. Hard edge edits are easy to spot. On a well exposed shot with good light already in the eyes I start off with the brushes opacity at between 25-30% and paint just color parts and pupils of the eyes(not the whites). I then lower the opacity to about 10-15% and paint in the whites. Zoom back out and click the little eye ball next to the layer you were working on and see before and after of your eye pop. If it's too much lower the opacity of the layer until it looks brighter to bring attention to the eyes, but not so bright that it looks like glowing alien eyes. One other thing I sometimes do to the eyes is add a little sparkle with a light dodge of the catchlights. To do this select the background layer, zoom way in so you can see both eyes on the screen, and use the dodge tool set to 10% strength and highlights to lightly dodge the catchlights on the colored parts of the pupils. I can't stress enought the word lightly as it's easy to overdue. If you touch the whites, just barely do it.
Ok, so that's way too much information about making the eyes pop, but the eyes are an important element to me. Next you want to convert to B&W. In CS3 I use the new B&W adjustment layer. This is a cool new feature. It allows you to click and drag parts of the photo and all the tones corresponding to the color at the spot your clicking either are lightened or darkened depending upon if you drag left or right. You can also manually tweak the individual color sliders to lighten and darken tones corresponding to color. I like this method because it reminds me of how true B&W film used to work and dragging the sliders is like adding colored filters. What's really cool about using it as a layer is that you can mask out certain areas that you don't like how the conversion is going and put another B&W adjustment layer on top of it that will only affect the areas you have masked from the first one. Take this shot for instance.
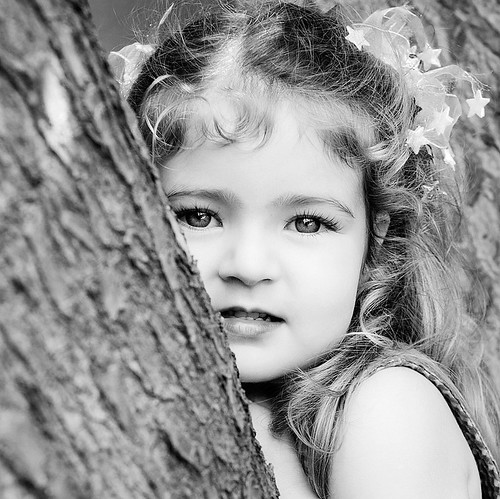
17-40 F/4L @ 29mm F/5.6 1/125th ISO100
I loved the B&W conversion I had going on, but by making her skin go super white it raised the red slider considerably. This had the effect of making her lips really bright. I wanted some contrast here, so I masked them out of the first B&W layer. This left a B&W shot with red showing through only on her lips. I then applied another B&W adjustment layer and darkened the reds to get the shot you see.
If you don't have CS3 google the net and there are dozens of ways to conver to B&W.
Finally I like to go through and selectively darken some areas to make others pop. This really helps to enhance the dynamic lighting. There's many ways to do this. Sometimes I simply use the burn tool set to shadows and about 10% strength. Other times I'll create a duplicate layer and change the mode to multiply. This works the opposite of a screen layer, so I can mask it out and selectively paint back the darkening using different strengths by altering the brush's opacity. The top image has this kind of multiply layer applied and I did about a 20% brush over the left portion of the image to let a fifth of the darkening come through, and a bit stronger brushing over the top left region. This gave a darkening while falling away effect. I also applied the opposite screen layer with about 20% coming through right on the face to brighten it. The contrast of the two makes the image pop and the focal point is firmly established. It also reminded me of the old Hollywood movie film lighting effects so I named the image Hollywood Starlit.
Anyways, just wanted to share a few tricks for enhancing your image, but I can't stress enough that's it's better to enhance a well captured image than it is to try to photoshop a bad image into a good one. In camera decisions are very important, as are taking into account your light sources around you.
11 comments:
How fantastic of you to share this! These photos you showed are my favorites of yours. WOW the catchligths you have and the tones are outstanding! Good job on the blog.
Justyna
www.funkymonkeyphoto.com
Great job with the description Randy!!
Randy, that's a great tutorial. My catchlights aren't as good as yours and after reading this, I will be more aware of any surroundings even when they say it's not the best time to photograph.
awesome explanation as always. I really value all of the time you put in to sharing your knowledge. Blog looks great!
Thank you for sharing all this Randy! A very interesting read. You understand light so well, it's inspiring.
Hi Randy,
Thanks for sharing, a very interesting read. I just wanted to comment on the method you use to brighten the eyes. Rather then duplicating the whole layer, which increases the size of your document substantially, I would suggest that you create a levels adjustment layer. Don't alter the setting, just create it and click ok, you can then change the levels adjustment layer blending mode to screen, thereby not increasing the size of your document to the same extent as duplicating the whole layer would. You can then apply the mask as needed.
Hope that helps! :-)
Holly
Thanks so much for sharing this! Wonderful advice.
How did I miss this?! Glad your house hunting went so well!
thank you for sharing this!
Excellent read! Thanks for writing this.
Sheyla
Like your blog, man. What photo editing app are you using? Want recommend you to try https://macphun.com/tonality this is photo editing software for MAC is great alternative for Adobe Photoshop.
Post a Comment